 Plain pumpkins are a little boring, and since you’re not, we came up with a four ways to give your gourds some life this Halloween. Each design is inspired by a ceramic piece from a different artist that Magenta works with. From clay flowers to the classic Rae Dunn lettering, these ideas will give a fun facelift to your traditional pumpkins.
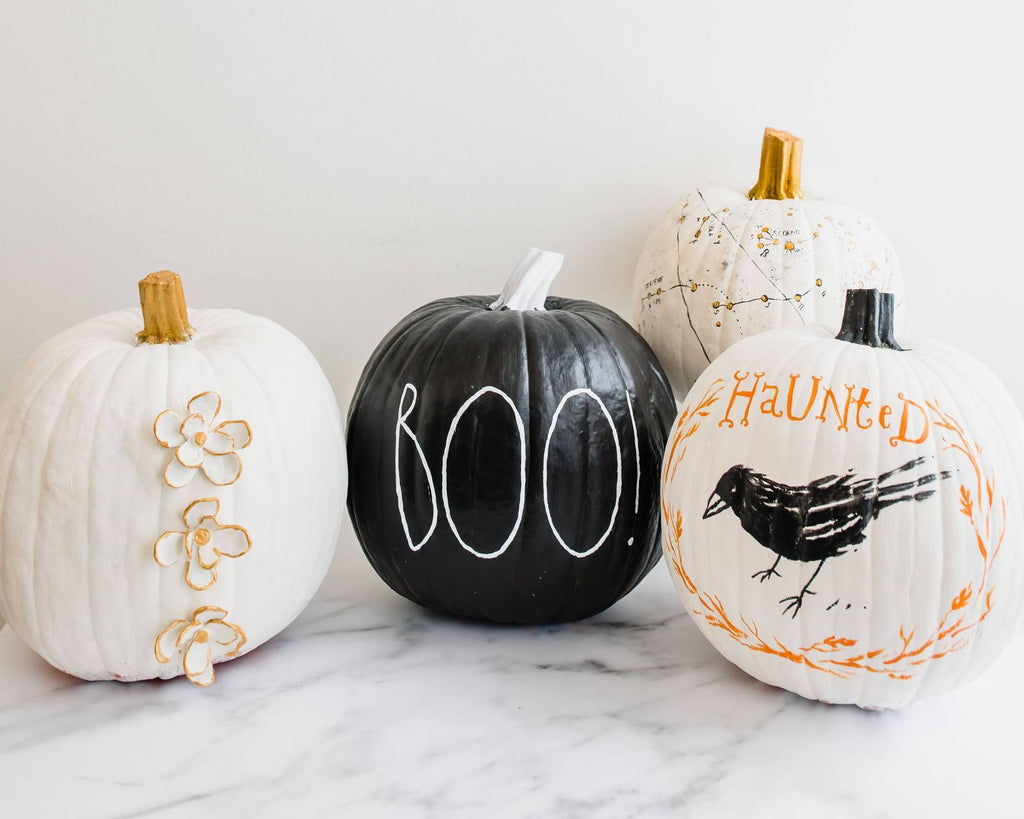
 1. Rae Dunn Halloween Pumpkin
 1. Rae Dunn Halloween Pumpkin
The love for the matte black Rae Dunn Halloween ceramics is far and wide which is why we thought this design worked great for this spooky holiday. We enlisted the help of our design team for the lettering, but you should be able to free-hand the letters. Pair it with a white stem on the pumpkin to keep it balanced.

2. Constellation Pumpkin
Inspired by our collection with Salt and Earth (shop collection here), we think this pumpkin is both elegant and unique. We painted the base a creamy white (tips on how are below), used a dark gray for the lines and gold paint for the stem and star details.

3. Clay Flower Pumpkin
Continuing with the theme of elegance, this pumpkin design was inspired by our collection with Studio B., more specifically this pitcher with flower details (shop here). This one has the same base and stem as the constellation pumpkin, however we used polymer clay for the details. The clay can be found at a craft store, and dries the longer it sits out, making it great to mold and stick on pumpkins. We used the same gold paint to add the touches on the edges.

4. Haunted Crow Pumpkin
Perhaps the spookiest design we did, it was inspired by the art of Angela Staehling. This particular collection can be found at TJ Maxx and Marshall's. We sketched out the crow and lettering beforehand and then went over it with paint once it was perfect.

Tips for pumpkin painting
1. Lay out newspaper or something to protect your surfaces. Even when you're careful, paint tends to get everywhere.
2. Skip painting the bottom of the pumpkin, no one sees it and it is hard for it to dry.
3. White paint took about 3 coats to be a solid white. Wait for the paint to completely dry before adding another coat.
4. In order to create a creamy white, add a tiny amount of yellow and brown- about the size of a pea. Mix, and see if it is the desired color.
5. Use acrylic paint. We found a nice set that included the gold at Michael's.
6. Enjoy the process. No pumpkin will turn out perfect and that is ok!


Mixing a tiny bit of brown and yellow to white paint creates a nice creamy white.


I love the way your pumpkins are inspired by your collections! Such a neat and unique idea!
Leave a comment